Introduction
In the realm of construction, two critical components often determine the long-term comfort, durability, and energy efficiency of a structure: Waterproofing & Thermal Insulation. Whether you’re developing a high-rise residential complex in Mumbai, constructing an industrial facility in Chennai, or building your dream home in Shimla, understanding these processes is vital for project success.
This blog post navigates through the intricacies of Waterproofing & Thermal Insulation across the project lifecycle in the Indian construction context. We’ll break down complex concepts into digestible information for everyone from seasoned professionals to first-time homebuilders.

Why Waterproofing & Thermal Insulation Matter
Before diving into procedures and standards, let’s understand why these components are crucial:
Waterproofing
- Prevents moisture intrusion that can damage structure and finishes
- Protects against mold and mildew growth
- Extends the building’s structural lifespan
- Maintains aesthetic appearance and prevents unsightly leakages
- Protects electrical and mechanical systems
Thermal Insulation
- Reduces energy consumption for heating and cooling
- Improves indoor comfort by maintaining consistent temperatures
- Decreases carbon footprint and promotes sustainability
- Reduces utility bills significantly
- Prevents condensation that leads to moisture-related problems
Project Life Cycle Overview
The implementation of waterproofing and thermal insulation follows these key phases:
- Pre-Design Phase: Requirement analysis and feasibility studies
- Design Phase: System selection and specification development
- Pre-Construction Phase: Material approval and mock-up testing
- Construction Phase: Application and quality control
- Post-Construction Phase: Performance evaluation and maintenance planning
Let’s examine each in detail.
1. Waterproofing Systems in Construction Projects
1.1 Types of Waterproofing Systems
| System Type | Applications | Advantages | Limitations |
|---|---|---|---|
| Cementitious Waterproofing | Basements, water tanks, wet areas | Cost-effective, easy application | Rigid, prone to cracking with structural movement |
| Liquid Applied Membranes | Roofs, balconies, bathrooms | Seamless application, flexible | Requires proper substrate preparation |
| PVC/TPO Membranes | Large roof areas, exposed terraces | High durability, UV resistant | Higher material cost, requires skilled installation |
| Bituminous Membranes | Underground structures, foundations | Good for high hydrostatic pressure | Temperature sensitive during installation |
| Crystalline Waterproofing | Concrete structures, water retaining structures | Penetrates into concrete, self-healing | Only works with concrete substrates |
| Polyurethane Coatings | Terraces, podiums, roof gardens | Highly elastic, abrasion resistant | Sensitive to moisture during application |
| Injection Grouting | Existing structures with leakages | Repairs active leaks in existing structures | Temporary in some cases, requires specialized equipment |
1.2 Material and Manpower Requirements
Materials:
- Primers and surface preparation materials
- Main waterproofing materials (membranes, coatings, additives)
- Protection layers (screed, protection boards)
- Accessories (corner tapes, sealants, waterstops)
- Testing equipment (flood testing apparatus, moisture meters)
Manpower:
- Waterproofing supervisors (1 per 10-15 workers)
- Skilled applicators (specialized training required)
- Quality control inspectors
- Material handlers
- Surface preparation crew
Skill Level Distribution (Typical):
- 1 Supervisor (experienced with certifications)
- 3-4 Skilled applicators (specialized training)
- 5-6 Semi-skilled workers (for preparation and assistance)
- 1-2 Quality control personnel
1.3 Key Methodologies for Waterproofing Execution
Foundation and Below-Grade Waterproofing
- External Tanking: Applied to outer walls before backfilling
- Surface preparation (cleaning, repairs)
- Primer application
- Membrane installation (typically bituminous or PVC)
- Protection board installation
- Drainage layer installation
- Backfilling with careful supervision
Basement Waterproofing
- Box-Type Waterproofing:
- RCC raft slab with waterproofing admixture
- External vertical wall waterproofing
- Internal wall and floor treatment
- Water bar installation at construction joints
- Post-construction injection grouting at any leakage points
Terrace/Roof Waterproofing
- Step-by-step procedure:
- Cleaning and preparation of substrate
- Application of screed for slope
- Primer application
- Main membrane/coating application
- Protection screed application
- Finishing layer application
1.4 Quality Control Checklist for Waterproofing
- Substrate moisture content within acceptable limits
- Surface preparation completed (no dust, oil, or loose particles)
- Ambient conditions suitable (temperature, humidity)
- Material properties verified against specifications
- Application thickness/coverage monitored and documented
- Lap joints and seams properly executed
- Penetrations and terminations detailed correctly
- Protection layers installed as specified
- Flood test conducted (for horizontal surfaces)
- Documentation completed (including photographs)
1.5 Stakeholders and Communication Matrix
| Stakeholder | Role in Waterproofing | Communication Protocol |
|---|---|---|
| Client/Owner | Final approval, budget constraints | Weekly reports, milestone approvals |
| Architect | System specification, design integration | RFIs, submittal reviews |
| Structural Engineer | Interface with structural elements | Technical queries, joint details |
| Waterproofing Consultant | System design, quality assurance | Daily inspection reports |
| Main Contractor | Overall coordination | Daily meetings, 3-week lookahead |
| Waterproofing Subcontractor | Execution, material procurement | Daily progress reports |
| PMC | Quality verification, schedule monitoring | Inspection requests, NCR management |
| Material Suppliers | Material quality, technical support | Material delivery schedules |
2. Thermal Insulation Systems
2.1 Types of Thermal Insulation Systems
| System Type | Applications | Advantages | Limitations |
|---|---|---|---|
| Expanded Polystyrene (EPS) | Wall insulation, roof insulation | Lightweight, cost-effective | Flammable, degrades with UV exposure |
| Extruded Polystyrene (XPS) | Inverted roofs, below-grade insulation | High compressive strength, moisture resistant | Higher cost, environmental concerns |
| Glass Wool | Partition walls, false ceilings | Good acoustic properties, non-combustible | Handling issues, requires protective gear |
| Rock Wool | Fire barriers, high-temperature applications | Excellent fire resistance, acoustic properties | Higher cost, water absorption |
| Polyisocyanurate (PIR) | High-performance roofing, cold storage | High R-value per inch, dimensionally stable | Cost, special handling for joints |
| Spray Polyurethane Foam | Complex geometries, retrofits | Seamless, high R-value, air sealing | Requires specialized equipment |
| Reflective Insulation | Hot climates, roof underside | Reflects radiant heat, lightweight | Less effective for conductive heat |
2.2 Material and Manpower Requirements
Materials:
- Insulation materials (boards, blankets, spray components)
- Adhesives and mechanical fasteners
- Vapor barriers/retarders
- Protective covering materials
- Sealants and tapes
Manpower:
- Insulation supervisor (1 per team)
- Skilled applicators (system-specific training)
- General laborers
- Quality inspectors
Skill Level Distribution (Typical):
- 1 Supervisor (with thermal insulation certification)
- 2-3 Skilled applicators (trained in specific systems)
- 3-4 Semi-skilled workers (for material handling and assistance)
- 1 Quality control personnel
2.3 Key Methodologies for Thermal Insulation Execution
External Wall Insulation (EIFS/ETICS)
- Step-by-step procedure:
- Surface preparation and leveling
- Starter track installation
- Adhesive application to insulation boards
- Board installation with staggered joints
- Mechanical fastening (if required)
- Base coat application with reinforcement mesh
- Primer application
- Finish coat application
Roof Insulation
Conventional Warm Roof:
- Vapor barrier installation on structural deck
- Insulation board installation
- Waterproofing membrane application
Inverted/Protected Roof:
- Waterproofing membrane installation
- Insulation board placement
- Filter fabric installation
- Ballast/paver installation
2.4 Quality Control Checklist for Thermal Insulation
- Material R-value/U-value verified against specifications
- Surface preparation completed
- Material storage conditions maintained
- No thermal bridges at junctions and penetrations
- Joint treatment properly executed
- Vapor barrier continuity maintained
- Fastening pattern as per design
- Protection from weather during installation
- Final thickness verified
- Documentation completed (including thermal imaging)
2.5 Stakeholders and Communication Matrix
| Stakeholder | Role in Thermal Insulation | Communication Protocol |
|---|---|---|
| Client/Owner | Performance requirements, budget | Monthly reports, energy performance updates |
| Architect | System specification, aesthetic integration | Submittal reviews, mock-up approvals |
| MEP Consultant | Energy performance calculations | Technical coordination meetings |
| Energy Consultant | System optimization, compliance verification | Performance verification reports |
| Main Contractor | Overall coordination | Weekly meetings |
| Insulation Subcontractor | Execution, material procurement | Daily progress reports |
| Material Suppliers | Material quality, technical support | Material submittal, delivery schedules |
| Testing Agency | Performance verification | Test reports, compliance certificates |
3. Relevant Standards and Guidelines
3.1 Indian Standards for Waterproofing
- IS 3067:2023: Code of practice for general design details and preparatory work for damp-proofing and waterproofing of buildings
- IS 1346:1991: Code of practice for waterproofing of roofs with bitumen felts
- IS 2645:2003: Specification for integral waterproofing compounds for cement mortar and concrete
- IS 16474:2020: Fluid applied waterproofing membranes for use below ceramic tile and stone finishes – Specification
- IS 12432 (Part 3):2021: Application of polyurethane waterproofing system – Code of practice
3.2 Indian Standards for Thermal Insulation
- IS 3346:1980: Method for the determination of thermal conductivity of thermal insulation materials
- IS 14164:2008: Industrial application and finishing of thermal insulation materials at temperature above -80°C and up to 750°C – Code of practice
- IS 16860:2018: Thermal insulation for buildings – Materials, products and systems – Specifications, applications, code of practice
- ECBC 2017: Energy Conservation Building Code (provides requirements for building envelope including insulation)
- NBC 2016: National Building Code of India (Part 11 – Approach to Sustainability)
3.3 International Standards (When Required)
- ASTM C578: Standard Specification for Rigid, Cellular Polystyrene Thermal Insulation
- ASTM D6878: Standard Specification for Thermoplastic Polyolefin Based Sheet Roofing
- BS 8102:2009: Code of practice for protection of below ground structures against water from the ground
- ISO 9001:2015: Quality management systems for certification of applicators
4. Design Basis Calculations
4.1 Waterproofing Design Considerations
Hydrostatic Pressure Calculation
For basement waterproofing, the hydrostatic pressure (P) can be calculated:
P = ρgh
Where:
- P = Hydrostatic pressure (kPa)
- ρ = Density of water (1000 kg/m³)
- g = Acceleration due to gravity (9.81 m/s²)
- h = Height of water column (m)
Example: For a basement 3m below water table: P = 1000 × 9.81 × 3 = 29,430 Pa ≈ 29.43 kPa
This pressure determines the required waterproofing system strength.
4.2 Thermal Insulation Design Calculations
U-Value Calculation
The U-value (thermal transmittance) for a wall assembly:
U = 1/R_total
Where R_total is the sum of R-values of all components:
R_total = R_si + R_1 + R_2 + … + R_n + R_so
Where:
- R_si = Internal surface resistance
- R_1, R_2, … R_n = Thermal resistance of each material layer
- R_so = External surface resistance
Example: For compliance with ECBC 2017 in composite climate (Residential): Required U-value for external wall: 0.4 W/m²K
For a typical wall assembly:
- 12mm plaster (R = 0.012)
- 230mm brick (R = 0.35)
- Insulation layer (to be determined)
- 12mm external plaster (R = 0.012)
- Surface resistances (R_si = 0.13, R_so = 0.04)
R_total without insulation = 0.13 + 0.012 + 0.35 + 0.012 + 0.04 = 0.544 m²K/W
Required R_total = 1/0.4 = 2.5 m²K/W
Therefore, required insulation R-value = 2.5 – 0.544 = 1.956 m²K/W
For EPS with thermal conductivity 0.036 W/mK: Required thickness = 1.956 × 0.036 = 0.07 m = 70mm
5. Project Execution Workflow
5.1 Waterproofing Execution Flowchart
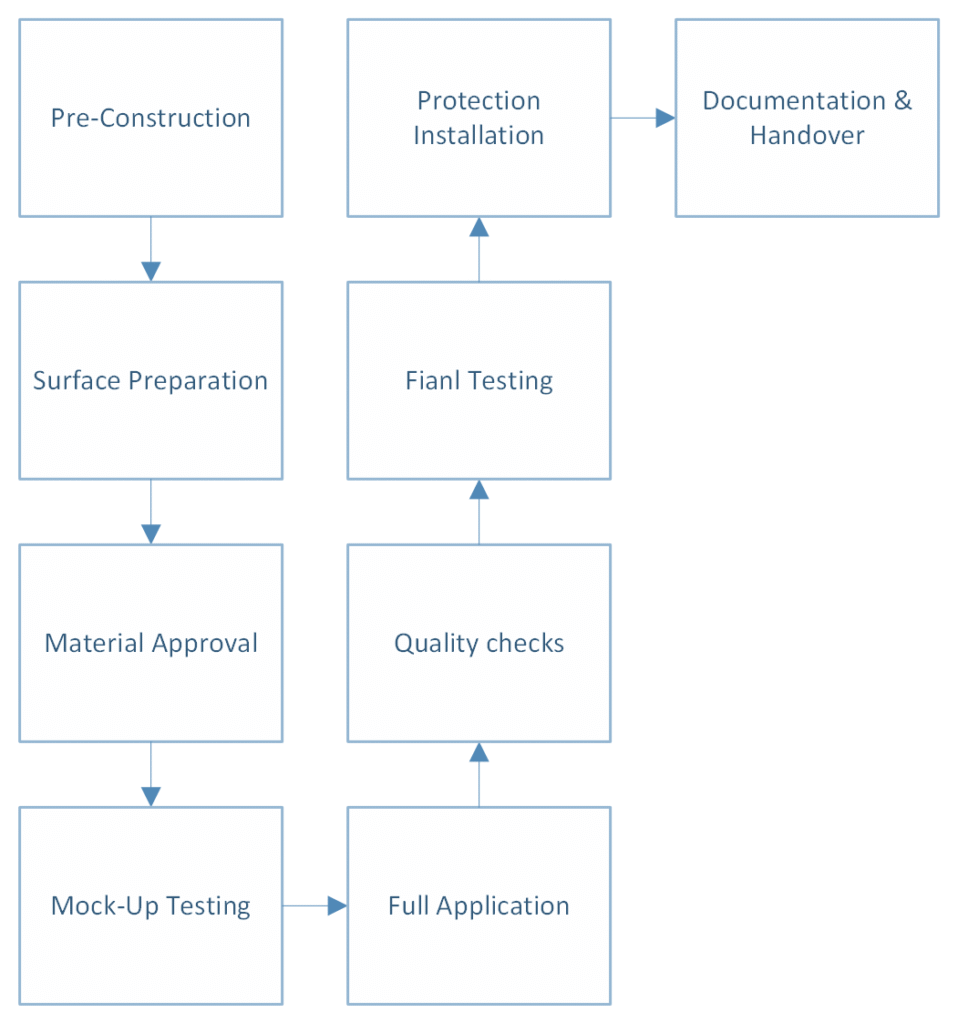
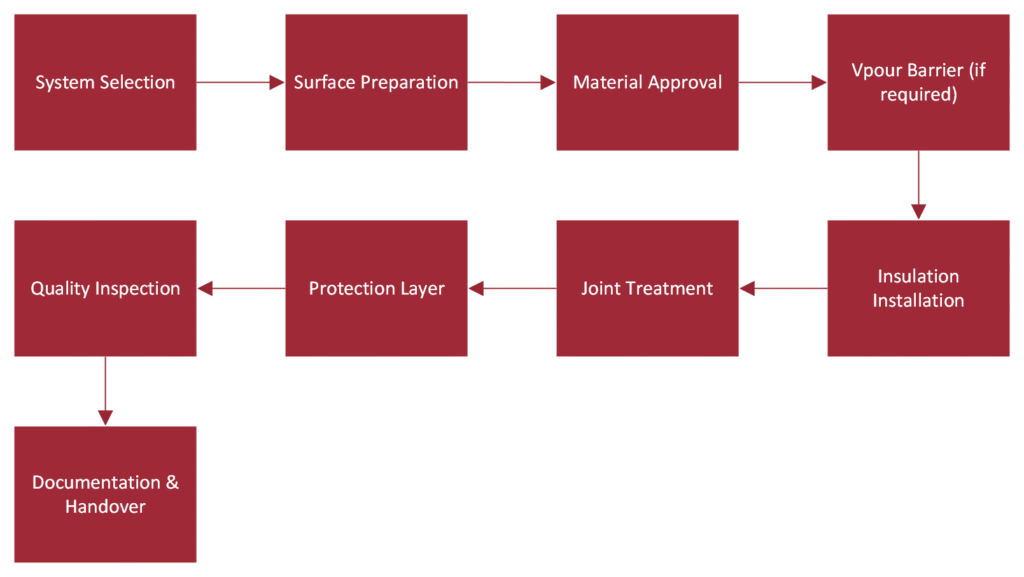
5.2 Thermal Insulation Execution Flowchart
6. Case Study: Integrated Waterproofing and Thermal Insulation for High-Rise Residential Project in Gurgaon
Project Overview
- Project Type: 35-story high-rise residential tower
- Location: Gurgaon, Haryana
- Climate Conditions: Hot summers, cold winters, moderate rainfall
- Project Area: 45,000 sqm built-up area
Challenges Faced
- High water table requiring robust basement waterproofing
- Extreme temperature variations demanding effective thermal insulation
- Multiple services penetrations through waterproofed areas
- Limited construction timeline during monsoon season
- Green building certification requirements
Solutions Implemented
Basement Waterproofing
A comprehensive box-type waterproofing solution was implemented:
- PVC membrane (1.5mm) for raft and external walls before backfilling
- Crystalline waterproofing admixture in concrete
- Waterstops at all construction joints
- Injection grouting standby system for leak remediation
Facade Thermal Insulation
- EIFS (External Insulation Finishing System) with 75mm EPS
- U-value achievement: 0.35 W/m²K (exceeding ECBC requirements)
- Specialized detailing at window interfaces to prevent thermal bridges
Terrace Treatment
Integrated solution combining waterproofing and insulation:
- Vapor barrier on RCC slab
- Slope screed for drainage
- Polyurethane waterproofing membrane (1.5mm)
- 100mm XPS insulation boards
- Filter fabric
- Protective concrete screed
- Reflective tile finish
Results and Benefits
- Zero water leakage incidents in 3 years since completion
- 23% reduction in energy consumption compared to similar buildings
- Green building certification achieved (IGBC Gold)
- Extended waterproofing warranty (10 years) secured due to quality implementation
- Reduced maintenance costs in operations phase
Key Learnings
- Integrated approach to waterproofing and thermal insulation yields better results
- Mock-up testing prevented large-scale issues during full implementation
- Specialized training for application teams improved quality
- Third-party quality inspection at critical stages ensured compliance
- Proper documentation facilitated maintenance planning
7. Value Engineering Opportunities
7.1 Design Phase Value Engineering
| Traditional Approach | Value Engineered Alternative | Benefit |
|---|---|---|
| Separate waterproofing and insulation systems | Integrated systems (e.g., insulated waterproofing membranes) | Reduced labor, faster installation, fewer layers |
| Generic specifications for all areas | Zone-specific system selection based on exposure | Optimized cost without compromising performance |
| Standard thickness for all insulation | Thermal modeling for thickness optimization | Material savings, improved performance |
| Full terrace waterproofing | Protected membrane roofs (inverted roofs) | Extended waterproofing life, simplified maintenance |
| Multiple waterproofing contractors | Single-source responsibility | Better coordination, clear warranty terms |
7.2 Construction Phase Value Engineering
| Area | Value Engineering Opportunity | Potential Savings |
|---|---|---|
| Material Selection | Local alternatives with proper testing and certification | 10-15% on material cost |
| Application Methods | Mechanized application vs. manual | 20-30% on labor, improved quality |
| Scheduling | Seasonal planning for temperature-sensitive applications | Reduced rework, faster execution |
| Protection Methods | Reusable protection systems vs. disposable | Lower project lifecycle cost |
| Quality Control | Digital documentation and thermal imaging | Early detection, prevention of costly repairs |
7.3 Maintenance Phase Value Engineering
- Implementing preventive maintenance schedules
- Using drone inspections for large roof areas
- Installing moisture monitoring systems in critical areas
- Creating detailed maintenance manuals with troubleshooting guides
- Training facility management teams for early problem detection
8. Common Failures and Preventive Measures
| Failure Mode | Causes | Preventive Measures |
|---|---|---|
| Membrane punctures | Mechanical damage during construction | Protection boards, restricted access |
| Thermal bridges | Poor detailing at junctions | Continuous insulation design, thermal break materials |
| Joint failures | Movement beyond design parameters | Proper joint design, elastomeric sealants |
| Condensation issues | Incorrect vapor barrier placement | Dew point analysis, proper system selection |
| Delamination | Poor surface preparation, incompatible materials | Adhesion tests, primer selection |
| Water stagnation | Inadequate slopes, blocked drains | Minimum 1:100 slope, regular maintenance |
| Material degradation | UV exposure, chemical attack | Protective coverings, compatible materials |
9. Emerging Trends and Innovations
9.1 Waterproofing Innovations
- Self-healing waterproofing membranes
- Nanotechnology-based hydrophobic coatings
- Electronic leak detection systems
- Bio-based waterproofing materials
- Digital monitoring systems for long-term performance
9.2 Thermal Insulation Innovations
- Aerogel insulation (ultra-low conductivity)
- Phase change materials (PCM) for thermal mass
- Vacuum insulation panels for space-constrained applications
- Bio-based insulation materials
- Smart dynamic insulation systems
10. Checklist for Project Implementation
10.1 Design Phase Checklist
- Climate analysis completed (rainfall patterns, temperature variations)
- Geological/hydrogeological study reviewed
- System selection criteria established
- Performance specifications developed
- Integration with other building systems verified
- Details for critical junctions developed
- Specifications reviewed by specialists
- Maintenance requirements documented
10.2 Pre-Construction Phase Checklist
- Material submittals approved
- Mock-up test plan developed
- Application team qualifications verified
- Storage and handling protocols established
- Quality control plan approved
- Inspection and test plan finalized
- Safety procedures for application reviewed
- Contingency plans for weather disruptions
10.3 Construction Phase Checklist
- Substrate acceptance criteria verified
- Material delivery schedule confirmed
- Application conditions monitored and documented
- Daily application records maintained
- Non-conformance reporting system implemented
- Protection of completed work enforced
- Regular third-party inspections conducted
- Testing at milestones executed
10.4 Post-Construction Phase Checklist
- Final inspection completed
- Performance testing documented
- As-built drawings finalized
- Warranty documentation obtained
- Maintenance manual prepared
- Training for maintenance teams conducted
- Emergency repair protocols established
- Long-term monitoring plan implemented
Conclusion
Waterproofing and thermal insulation represent critical components in the construction lifecycle that directly impact a building’s durability, energy efficiency, and occupant comfort. By understanding the systems, standards, and execution methodologies outlined in this article, stakeholders can make informed decisions that lead to successful implementation.
Whether you’re a developer overseeing a large commercial project, an engineer designing systems, or a homeowner planning construction, attention to these elements will yield significant long-term benefits. Remember that the initial investment in quality waterproofing and insulation systems typically represents less than 2-5% of construction costs but can prevent damages and energy losses that far exceed this amount over the building’s lifespan.
By integrating the principles, standards, and best practices outlined in this guide, you can ensure that your construction project achieves optimal performance, durability, and sustainability.